
Welcome to the AGA Oil Control Valve instructions, your comprehensive guide to understanding, installing, and maintaining this essential component․ Designed for both homeowners and technicians, this guide covers operation, troubleshooting, and optimization to ensure your AGA system runs efficiently and safely․
Overview of the AGA Oil Control Valve
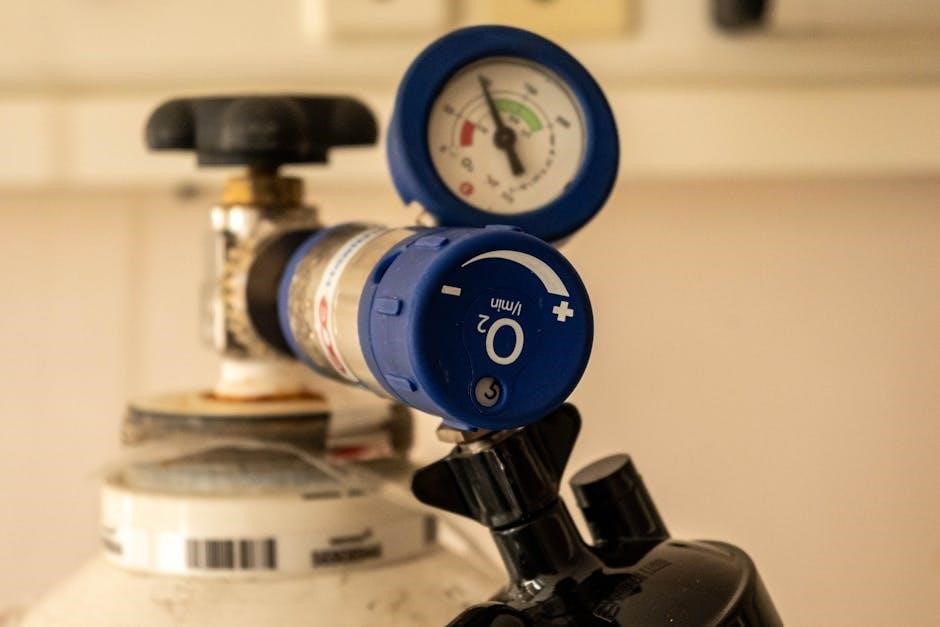
The AGA Oil Control Valve is a critical component designed to regulate oil flow to the burner, ensuring precise temperature control in AGA cookers․ It operates in both manual and automatic modes, allowing users to adjust oil flow according to their needs․ The valve features a reset lever, control knob, and adjustment screw, enabling fine-tuning of oil delivery․ Its robust design ensures reliable performance, making it a vital part of oil-fired cooking systems․ Proper operation and maintenance of this valve are essential for optimal cooker functionality, safety, and energy efficiency․
Importance of Proper Oil Control Valve Operation
Proper operation of the AGA Oil Control Valve is crucial for ensuring efficient and safe functioning of your cooker․ Incorrect settings can lead to inefficient fuel use, inconsistent cooking temperatures, or even safety hazards․ By accurately controlling oil flow, the valve helps maintain optimal burner performance, reduces energy waste, and prevents potential risks like oil leaks or spills․ Regular maintenance and adherence to operating instructions are essential to preserve the valve’s functionality and extend its lifespan․ Proper operation also ensures compliance with safety standards, safeguarding both your appliance and home․ Always follow the manufacturer’s guidelines to achieve reliable and efficient cooker performance․

Installation of the AGA Oil Control Valve
Installing the AGA Oil Control Valve requires careful preparation and adherence to manufacturer guidelines․ Ensure all oil valves are open and oil is present before starting․ Proper alignment and connection of the valve to the system are vital for smooth operation․ Follow step-by-step instructions to secure the valve, connect fuel lines, and test functionality post-installation․ Ensuring correct installation prevents leaks and ensures optimal performance․
Pre-Installation Checks
Before installing the AGA Oil Control Valve, perform essential checks to ensure a smooth process․ First, verify that all oil valves along the feed pipe are fully open․ This ensures proper oil flow to the valve․ Next, confirm that the oil control valve is filled with oil, as an empty valve can lead to operational issues․ Inspect the system for any existing leaks or blockages that might interfere with installation․ Additionally, check the compatibility of the valve with your AGA system to avoid mismatches․ Finally, ensure all necessary tools and components are readily available to complete the installation efficiently․
Step-by-Step Installation Guide
Open all valves on the oil feed pipe from the storage tank to the burner oil control box․ 2․ Switch on the electric supply to the oil control box․ 3․ Press down the reset lever located on the front of the valve to ensure proper initialization․ 4․ Turn the control knob fully anti-clockwise to set the valve to the minimum flow position․ 5․ Check for any leaks around connections and ensure all components are securely fitted․ 6․ Test the system by operating the valve manually and automatically to confirm smooth functionality; Follow these steps carefully to ensure correct installation and optimal performance of your AGA Oil Control Valve․
Post-Installation Verification
After installing the AGA Oil Control Valve, perform a thorough verification to ensure proper functionality․ First, check that all oil valves are open and oil is present in the valve․ Turn the control knob to the “MK6” position to test manual operation․ Lift the arming lever to confirm it disarms the valve․ Press the reset lever to ensure it initializes correctly․ Verify that the valve transitions smoothly between manual and automatic modes․ Inspect all connections for leaks and ensure the system operates without issues․ Finally, monitor the oil flow rate and temperature settings to confirm they align with your cooker’s requirements․ This step ensures your AGA system is ready for safe and efficient operation․
Operating the AGA Oil Control Valve
Operating the AGA Oil Control Valve involves switching between manual and automatic modes, adjusting the control knob, and utilizing the reset and arming levers for precise and efficient oil flow management․
Manual Operation Mode
The manual operation mode allows users to directly control the oil flow to the burner․ To engage manual mode, ensure all oil valves are open and oil is present in the control valve․ Depress the reset lever located on the front of the valve․ Next, lift the arming lever to activate manual control․ Use the control knob to adjust the oil flow rate, turning it clockwise or counterclockwise as needed․ This mode is ideal for precise temperature control and ensures consistent performance․ Always refer to the valve’s manual for specific instructions, as improper adjustment can affect burner efficiency and safety․
Automatic Operation Mode
The automatic operation mode enables the AGA Oil Control Valve to regulate oil flow based on the cooker’s temperature requirements․ To activate this mode, ensure all oil valves are open and oil is present in the valve․ Turn the control knob fully anti-clockwise to engage automatic operation․ The valve will then meter the oil flow to maintain the desired temperature, either through manual adjustment or thermostatic control․ This mode is ideal for consistent performance without constant manual intervention․ Always ensure the valve is properly armed and the reset lever is in the correct position before switching to automatic mode for optimal functionality and safety․
Adjusting the Control Knob
Adjusting the control knob on the AGA Oil Control Valve ensures precise oil flow regulation․ To begin, locate the control knob, typically marked with settings like “Low Fire” and “High Fire․” To increase oil flow, turn the knob anticlockwise; for a decrease, turn it clockwise․ When setting the valve to “Manual” mode, ensure all oil feed valves are open․ For “Low Fire,” set the knob to the minimum position and adjust anticlockwise to increase flow․ For “High Fire,” set to maximum and adjust as needed․ Proper adjustment ensures efficient burner performance and optimal temperature control in your AGA cooker, maintaining consistent heat output and energy efficiency․
Understanding the Reset Lever Function
The reset lever on the AGA Oil Control Valve is a critical component for restarting the system after a shutdown or interruption․ Located on the front of the valve, it ensures proper oil flow resumption․ To use it, depress the lever gently but firmly until you feel a distinct “click,” indicating the valve has reset․ This action reactivates the oil supply to the burner, ensuring consistent operation․ Always ensure the oil supply is sufficient and all valves are open before resetting․ Improper use can lead to system malfunctions, so follow instructions carefully to maintain safety and efficiency․ Regular checks ensure the lever functions smoothly, preventing operational disruptions․

Safety Precautions and Best Practices
Always ensure the oil supply is secure and valves are open before operating․ Handle electrical components with caution and avoid over-tightening connections․ Regular inspections are essential for safe operation․
General Safety Guidelines
Ensure the oil supply is secure and all valves are open before operating the AGA Oil Control Valve․ Always handle electrical components with care, avoiding over-tightening connections․ Regular inspections are crucial to prevent oil leaks and ensure proper function․ Depress the reset lever gently and only when necessary․ Turn the control knob fully anti-clockwise before switching on the electric supply․ Never attempt to adjust the valve while the system is in operation․ Use the correct model-specific instructions for your AGA cooker to avoid malfunctions․ Always refer to professional guidance for complex adjustments to maintain safety and efficiency․
Emergency Shutdown Procedures
In case of an emergency, switch off the electric supply to the oil control box immediately․ Close all oil valves to stop oil flow to the burner․ Press and hold the reset lever on the oil control valve to shut down the system․ Ensure the valve is fully disengaged to prevent any residual oil flow․ If an oil leak is detected, isolate the oil supply line and contact a professional․ Always follow these steps promptly to avoid potential hazards․ Regular maintenance and inspections can help prevent emergencies, but knowing these procedures ensures safety when issues arise․
Preventing Oil Leaks and Spills
Regularly inspect all connections and gaskets in the oil control valve system to ensure they are tight and free from wear․ Use compatible materials for seals and gaskets to prevent degradation․ Avoid over-tightening, as this can damage threads and lead to leaks․ After installation or maintenance, test the system under low pressure to identify potential leaks early․ Replace any worn-out or damaged components promptly․ Keep the valve and surrounding area clean to prevent contaminants from affecting performance․ Properly align and support oil feed pipes to avoid stress on connections․ By following these steps, you can minimize the risk of oil leaks and spills, ensuring safe and efficient operation․
Troubleshooting Common Issues
Identify and address common problems like oil flow issues, reset lever malfunctions, and control knob errors․ Diagnose causes and apply targeted solutions to restore proper functionality quickly․
Diagnosing Oil Flow Problems
To diagnose oil flow issues, start by ensuring the oil control valve is fully open and the reset lever is properly engaged․ Check if the control knob is set to the correct position, such as the MK6 setting for manual operation․ Verify that all valves on the oil feed pipe are open and that the oil supply is sufficient․ If the valve is not metering oil correctly, inspect for blockages or debris in the valve or oil feed lines․ Ensure the adjustment screw is set appropriately for the desired flow rate․ If issues persist, consult the troubleshooting guide for specific fault resolution steps․
Resolving Faulty Reset Lever Operation
If the reset lever fails to function, ensure it is properly engaged and free from obstructions․ Check for any debris or oil residue that may hinder its movement․ Lightly clean the lever and surrounding area with a soft cloth․ Ensure the oil control valve is well-lubricated, as dry parts can cause sticking․ If the lever still does not operate smoothly, inspect for worn or damaged components and replace them if necessary․ Refer to the maintenance section for lubrication and part replacement guidelines․ Proper reset lever operation is crucial for safe and efficient system performance, so address any issues promptly to avoid further complications․
Addressing Control Knob Malfunctions
If the control knob malfunctions, start by ensuring it is clean and free from oil residue․ Gently wipe it with a soft cloth to remove any contaminants․ If the knob feels stiff or stuck, apply a small amount of lubricant to the pivot point․ Check that the knob is properly aligned with the valve stem to ensure smooth rotation․ If the issue persists, inspect the internal mechanism for wear or damage․ In such cases, replacing the control knob or its associated components may be necessary․ Always refer to the manufacturer’s guidelines for part compatibility and replacement procedures․ Proper functionality of the control knob is essential for precise oil flow regulation․

Maintenance and Care
Regular cleaning, inspecting for wear, and replacing worn parts are essential․ Lubricate moving components to ensure smooth operation and maintain optimal performance over time․
Scheduled Maintenance Tasks
Regular maintenance is crucial for optimal performance․ Schedule annual inspections by a qualified technician to check for wear and tear․ Clean the valve and its components every six months to prevent oil residue buildup․ Lubricate all moving parts to ensure smooth operation․ Replace any worn-out seals or gaskets promptly to avoid leaks․ Check the oil flow rate and adjust if necessary․ Inspect the electrical connections for damage or corrosion․ Ensure the reset lever and control knob function correctly․ Keep the oil control valve free from debris and contaminants․ Always refer to the manufacturer’s guidelines for specific maintenance recommendations tailored to your AGA model․ Consistency ensures longevity and reliability․
Cleaning the Oil Control Valve
Cleaning the AGA Oil Control Valve is essential to maintain its functionality․ Start by turning off the power and oil supply․ Use a soft cloth to wipe away surface dirt․ Remove the valve cover and soak internal components in a mild solvent․ Scrub gently with a toothbrush to eliminate oil residue․ Reassemble the valve and ensure all connections are secure․ Avoid harsh chemicals that might damage the finish․ Regular cleaning prevents oil buildup and ensures precise control․ Always follow manufacturer guidelines for specific cleaning instructions tailored to your AGA model․ A clean valve ensures smooth operation and longevity of your system․
Lubrication and Part Replacement
Proper lubrication and timely part replacement are crucial for the AGA Oil Control Valve’s performance․ Apply a small amount of silicone-based grease to moving parts, such as the adjustment screw and reset lever, to ensure smooth operation․ Inspect for worn or damaged components, like O-rings or gaskets, and replace them immediately to prevent leaks․ Use only original or approved replacement parts to maintain compatibility․ Lubricate the valve annually or as needed, depending on usage․ Regular maintenance extends the valve’s lifespan and ensures consistent oil flow regulation․ Always refer to the manufacturer’s guidelines for specific replacement instructions to avoid improper installation and potential system issues․
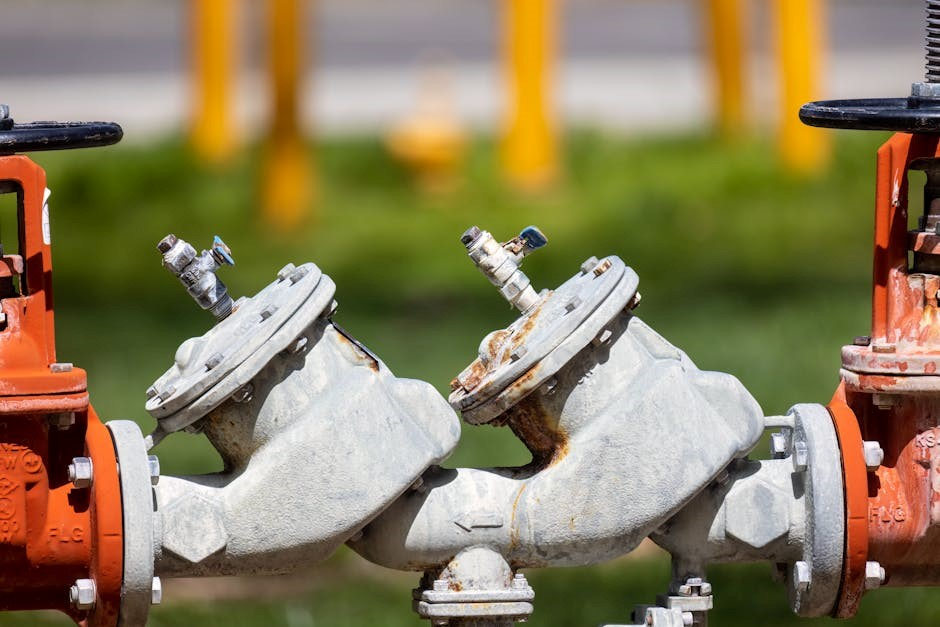
Understanding the Components
The AGA Oil Control Valve comprises key parts like the control knob, reset lever, and adjustment screw, each playing a vital role in regulating oil flow and system operation․
Key Parts of the Oil Control Valve
The AGA Oil Control Valve features several essential components designed to regulate oil flow efficiently․ The control knob allows manual or automatic operation, adjusting oil flow rates․ The reset lever is used to reset the valve, ensuring proper function after maintenance․ The adjustment screw fine-tunes oil flow, enabling precise control over burner performance․ Additionally, the arming lever activates or deactivates the valve, while the thermostatic control monitors temperature for consistent heating․ These components work together to ensure safe, reliable, and efficient operation of your AGA system․
Role of the Adjustment Screw
The adjustment screw plays a crucial role in fine-tuning the oil flow rate within the AGA Oil Control Valve․ By turning the screw clockwise or counterclockwise, users can increase or decrease the oil supply to the burner․ This precise control allows for optimal burner performance, ensuring efficient combustion and consistent heat output․ Proper adjustment is essential to maintain the correct oil flow, preventing issues like insufficient heat or excessive fuel consumption․ Regular calibration of the adjustment screw, as outlined in the manual, helps maintain the valve’s accuracy and reliability over time, ensuring your AGA system operates at peak performance levels consistently․
Function of the Arming Lever
The arming lever on the AGA Oil Control Valve is a critical component that enables or disables the valve’s operation․ By depressing the lever, the valve is armed, allowing oil to flow to the burner․ Lifting the lever disarms it, stopping the oil supply․ This mechanism ensures safe and controlled operation, preventing unintended oil flow․ The arming lever is particularly useful during maintenance or when the burner is not in use․ Proper use of the arming lever is essential for maintaining safety and efficiency in your AGA system․ Always consult the manual for specific instructions on arming and disarming procedures for your model․
Advanced Adjustment Techniques
Master advanced AGA Oil Control Valve techniques for precise oil flow regulation․ Learn calibration, fine-tuning, and adjusting settings for optimal performance and efficiency in your system․
Calibrating the Oil Flow Rate
Calibrating the oil flow rate ensures your AGA system operates efficiently․ Start by turning the control knob fully anti-clockwise to minimize oil flow․ Next, switch on the electric supply and press the reset lever․ Use the adjustment screw to fine-tune the flow, ensuring it matches your cooker’s requirements․ For precise calibration, refer to the manufacturer’s guidelines or consult a professional if unsure; Proper calibration prevents over or under-fueling, optimizing performance and safety․ Regular checks are recommended to maintain consistency and reliability in your AGA cooker’s operation․
Setting the Low Fire and High Fire Modes
To set the low fire mode, turn the control knob to the “MIN” position and adjust the screw anticlockwise to increase oil flow for a steady, low burn․ For high fire mode, set the knob to “MAX” and turn the screw anticlockwise to achieve maximum oil flow and higher temperatures․ Ensure all valves are open and oil is present in the control valve before adjusting․ Proper calibration ensures optimal performance and efficiency, preventing over or under-fueling․ Regular checks and adjustments are essential for maintaining consistent cooking temperatures and safety in your AGA cooker․
Fine-Tuning the Thermostatic Control
Fine-tuning the thermostatic control on your AGA Oil Control Valve ensures precise temperature regulation․ Start by ensuring the valve is in thermostatic mode, then adjust the thermostat dial to your desired temperature․ Use an Allen wrench to fine-tune the adjustment screw, making small increments to avoid over-correction․ Monitor the cooker’s response and adjust as needed for consistent heat output․ Proper calibration ensures optimal cooking performance and energy efficiency․ Regular fine-tuning is essential to maintain accurate temperature control, especially after initial installation or maintenance․ Always refer to the manufacturer’s guidelines for specific adjustment procedures to achieve the best results for your AGA cooker․

Specialized Instructions for AGA Models
Follow specific guidelines for AGA Cooker models, ensuring compatibility with Toby DVR5 and other systems․ Verify oil flow settings and adjustment procedures for optimal performance across different AGA configurations․
Specific Guidelines for AGA Cooker Models
For AGA cooker models, ensure compatibility with the Toby DVR5 oil control valve, designed for manual or automatic operation․ Always refer to the specific model’s manual for installation and adjustment procedures․ When setting up, verify the oil flow rate matches the cooker’s requirements․ For models with thermostatic control, calibrate the valve to maintain consistent temperatures․ Regularly inspect the reset lever and control knob for proper function․ Follow the recommended maintenance schedule to prevent oil leaks and ensure efficient performance․ Address any issues promptly to avoid downtime and maintain safety standards․ By adhering to these guidelines, you can optimize your AGA cooker’s operation and longevity․
Compatibility with Different AGA Systems
Ensure the oil control valve is compatible with your AGA system by verifying its specifications․ The Toby DVR5 model is designed for AGA cookers, offering manual or automatic operation․ For larger systems, the Toby 48cc Manual/Auto OCV is recommended․ Compatibility depends on your cooker’s burner type, fuel flow requirements, and existing setup․ Always check the technical specifications to confirm suitability․ If unsure, consult the AGA cooker manual or contact a certified technician․ Proper compatibility ensures efficient performance, safety, and optimal fuel metering for your AGA cooker․ This step is crucial to avoid installation issues and maintain system reliability over time․
Resetting the AGA Oil Control Valve
Resetting the AGA Oil Control Valve ensures proper functionality after maintenance or issues․ Follow the step-by-step reset process to restore optimal performance safely and effectively․
When to Reset the Valve
Reset the AGA Oil Control Valve in specific scenarios to ensure proper functionality․ Resetting is necessary after maintenance, if the burner fails to light, or if oil flow is inconsistent․ Additionally, reset the valve when the system indicates a fault or after addressing issues like oil leaks․ Resetting ensures the valve recalibrates to optimal settings, maintaining efficient oil flow and safe operation․ Regular resets can prevent malfunctions and extend the valve’s lifespan․ Always refer to the manufacturer’s guidelines for the correct reset procedure to avoid potential damage or safety hazards․
Step-by-Step Reset Process
To reset the AGA Oil Control Valve, follow these steps:
Ensure all oil valves on the feed pipe are fully open and the valve is filled with oil․
Locate the reset lever (A) on the front of the oil control valve (B)․
Depress the reset lever gently but firmly until it clicks into place․
Hold the lever for a few seconds to ensure the valve resets properly․
Release the lever and allow it to return to its original position․
Check the burner operation to confirm the reset was successful․
This process ensures the valve recalibrates and resumes normal operation․ Always perform the reset carefully to avoid system malfunctions․
Proper operation and regular maintenance ensure optimal performance and safety․ Follow guidelines for efficient use and troubleshooting․ Adhere to instructions for longevity and reliability․
Proper operation and maintenance of the AGA Oil Control Valve are crucial for efficient and safe functionality․ Always ensure oil valves are open and oil is present before use․ Depressing the reset lever resets the valve, while the control knob adjusts oil flow rates․ Regularly check and maintain the valve to prevent malfunctions․ Adhere to safety guidelines and perform scheduled maintenance to ensure longevity․ By following these steps, you can optimize performance, maintain safety, and extend the lifespan of your AGA system․
Final Tips for Optimal Performance
To ensure your AGA Oil Control Valve operates at its best, always monitor oil levels and valve positions before use․ Regularly clean and lubricate moving parts to maintain smooth operation․ Adjust the control knob carefully, as over-adjustment can disrupt oil flow․ Schedule periodic inspections to identify and address potential issues early․ Keep the valve free from debris and ensure proper alignment of components․ For optimal performance, follow the recommended maintenance routine and consult the manual for specific adjustments․ By adhering to these tips, you can maximize efficiency, extend the valve’s lifespan, and enjoy consistent performance from your AGA system․